Remko Weijnen's Blog (Remko's Blog)
About Virtualization, VDI, SBC, Application Compatibility and anything else I feel like
Modern systems usually offer different SATA Operation Modes such as ATA, AHCI or IRRT.
The AHCI mode offers extra features such as hot swapping and native command queuing.
Many vendors set the SATA Operation Mode to ATA by default because it’s the most compatible mode but there are a few reasons why you might want to change it:
- AHCI has a higher performance than ATA.
- AHCI is a requirement for the TRIM command.
- AHCI is required for self encrypting hard drives
Please note that the IRRT (integrated raid) mode is supposed to support all functionality of AHCI but in my experience it doesn’t.
So the question is: how do we switch the SATA Operation Mode from ATA or IRRT to AHCI?
The switch itself is very easy, just go to your bios and change the setting. On my Dell laptop, the setting is System Configuration | SATA Operation:
But if we change this setting after we have installed the Operating System it will crash on boot with a STOP 0x0000007B INACCESSABLE_BOOT_DEVICE error:
There is a Microsoft KB Article that describes the steps required to fix this problem. However for Intel SATA Controllers (the most common) we need to perform a few additional steps.
After some experiments I was able to create a recipe for it:
- Set the Microsoft MSAHCI driver to Autostart
- Add the Hardware (PnP) Id of your SATA controller to the Critical Device Database in the registry
- Add Intel’s iaStor driver to both registry and drivers folder
- Add the Device Instance Path of your SATA controller to the iaStor registry key.
On a Dell Precision M4500 the reg file to accomplish these steps looks like this:
Unfortunately both the Hardware Id and Device Instance Path differ for each SATA controller. So how do we obtain the correct values?
If you have another machine with the same SATA controller which is already in AHCI mode then you can simply look up the values in Device Manager.
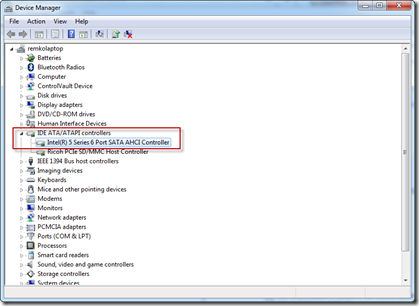
Just find your AHCI controller under IDE ATA/ATAPI controllers:
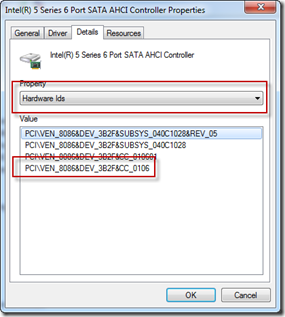
Right Click, select properties and on the Details tab select Hardware Ids. The PNP id is the bottom value:
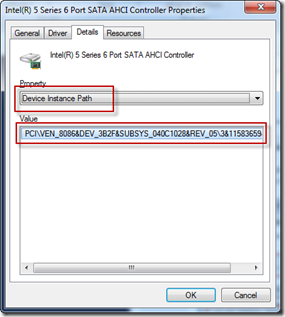
Then select the Device Instance Path Property:
But how do we obtain the proper values if you are not fortunate enough to have another system?
I figured the easiest way would be to write a tool that can lookup these values programmatically and run that under Windows PE (from CD/DVD or USB).
So how does it work? Assuming you already have a Windows PE bootdisk, the steps are:
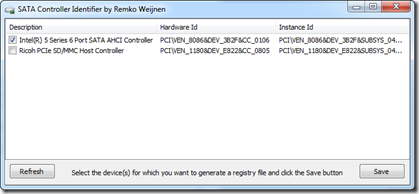
Switch the SATA Operation Mode to AHCI, boot Windows PE and start my tool (sci.exe). It will automatically search for and display all SATA storage controllers:
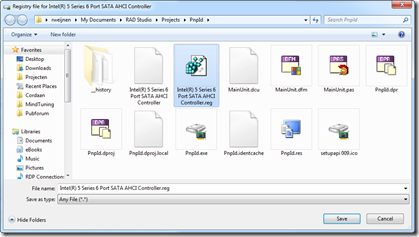
Select the controller for which you would like to generate a reg file and click the Save button which allows you to pick the name and place where you want to save the reg file:
Update 21-06-2011: The Save File Dialog didn’t work properly under Windows PE, I have uploaded a new version of the tool (1.1) that contains a fix.
Here is an example file for a Dell Latitude E6500:
1 2 3 4 5 6 7 8 9 10 11 12 13 14 15 16 17 18 19 20 21 22 23 24 25 26 27 28 29 30 31 32 33 | Windows Registry Editor Version 5.00 ; Generated with SATA Controller Identifier ; by Remko Weijnen ; see https://www.remkoweijnen.nl/blog/2011/06/18/switch-sata-operation-mode/ ; Set Microsoft AHCI driver to Autostart [HKEY_LOCAL_MACHINE\SYSTEM\CurrentControlSet\services\msahci] "Start"=dword:00000000 ; Add Intel(R) ICH9M-E/M SATA AHCI Controller to the Critical Device Database [HKEY_LOCAL_MACHINE\SYSTEM\CurrentControlSet\Control\CriticalDeviceDatabase\PCI\VEN_8086&DEV_2929&CC_0106 "ClassGUID"="{4d36e96a-e325-11ce-bfc1-08002be10318}" "Service"="iaStor" ; Set Intel iaStor driver to Autostart [HKEY_LOCAL_MACHINE\SYSTEM\CurrentControlSet\Services\iaStor] "Type"=dword:00000001 "Start"=dword:00000000 "Group"="SCSI miniport" "ErrorControl"=dword:00000001 "ImagePath"="system32\\drivers\\iaStor.sys" "tag"=dword:00000019 "DisplayName"="Intel AHCI Controller" [HKEY_LOCAL_MACHINE\SYSTEM\CurrentControlSet\Services\iaStor\Parameters] "queuePriorityEnable"=dword:00000000 ; Add Device Instance Path to the iaStor Enum key [HKEY_LOCAL_MACHINE\SYSTEM\CurrentControlSet\services\iaStor\Enum] "Count"=dword:00000001 "NextInstance"=dword:00000001 "0"="PCI\VEN_8086&DEV_2929&SUBSYS_024F1028&REV_03\3&2B8E0B4B&0&FA" |
Now we need to import the generated reg file in your Windows installation. To be able to do this, you have to first switch back the SATA Operation Mode to the previous setting to prevent the BSOD.
After importing the generated reg file, copy the iaStor file to the Drivers folder (usually C:\Windows\System32\Drivers) and reboot.
Final step is to switch the SATA Operation Mode to AHCI for the last time and boot into the OS.
Although not strictly required it’s a good idea to install the full intel drivers (Intel Rapid Storage Technology). At the time of writing the latest version was 10.1.0.1008 which can be found here.
It would nice if we could compile a list of popular SATA controllers so we can help other people so please consider running the tool on your system and adding the results as a comment here.
SATA Controller Identifier (5512 downloads )Profile
Top Posts
- Query Active Directory from Excel
- RNS 510 Startup Logo–My thoughts
- Adding a hidden Exchange mailbox to Outlook
- How rdp passwords are encrypted
- Get Actual CPU Clock Speed with PowerShell
- ClickOnce Applications in Enterprise Environments
- VW RNS 510 Navigation Startup Pictures
- Unattended Installation of IBM System i Access for Windows
- Reading physical memory size from the registry
- Show Client IP Address when using NetScaler as a Reverse Proxy
Recent Comments
Featured Downloads
- AClientFix (13595 downloads )
- AddPrinter2.zip (12854 downloads )
- AdProps (12379 downloads )
- AdSample1 (11432 downloads )
- AMD Radeon Crimson ReLive (30246 downloads )
- Atheros Driver (34019 downloads )
- AutoLogonXP 1.0 (11404 downloads )
- CDZA (9560 downloads )
- ChDrvLetter.zip (11217 downloads )
- ChDrvLetter.zip (14356 downloads )
Blogroll
- Andrew Morgan
- Arnout’s blog
- Assa’s Blog
- Barry Schiffer
- Delphi Praxis
- Ingmar Verheij
- Jedi Api Blog
- Jedi API Library
- Jeroen Tielen
- Kees Baggerman
Categories
- .NET (4)
- Active Directory (28)
- Altiris (36)
- App-V (1)
- Apple (5)
- Application Compatibility (11)
- Automotive (5)
- AWS (1)
- BootCamp (1)
- C# (6)
- C++ (2)
- Citrix (87)
- Delphi (61)
- Embedded (4)
- Exchange (16)
- General (71)
- iPhone (5)
- Java (8)
- Linux (1)
- Lync (2)
- NetScaler (1)
- Oracle (4)
- Other (1)
- Packaging (19)
- PowerShell (56)
- Programming (79)
- Quest (1)
- RES (7)
- script (22)
- ShareFile (1)
- SQL Server (10)
- Strange Error (3)
- Terminal Server (68)
- ThinApp (3)
- ThinKiosk (1)
- Ubuntu (1)
- Unattended Installation (19)
- Uncategorized (51)
- UWP (2)
- Vista (37)
- Visual Studio (1)
- VMWare (26)
- Windows 10 (2)
- Windows 2003 (30)
- Windows 2008 (37)
- Windows 2008 R2 (16)
- Windows 2012 (2)
- Windows 7 (30)
- Windows 8 (4)
- Windows Internals (12)
- Windows XP (16)
Archives
- February 2023 (1)
- October 2022 (3)
- July 2022 (1)
- June 2022 (2)
- October 2019 (1)
- March 2018 (1)
- January 2018 (4)
- December 2017 (3)
- April 2017 (1)
- March 2017 (5)
- February 2017 (4)
- May 2016 (3)
- March 2016 (1)
- October 2015 (2)
- September 2015 (1)
- January 2015 (1)
- August 2014 (1)
- July 2014 (8)
- May 2014 (1)
- November 2013 (1)
- October 2013 (2)
- September 2013 (3)
- August 2013 (4)
- June 2013 (2)
- May 2013 (3)
- April 2013 (5)
- March 2013 (5)
- February 2013 (1)
- January 2013 (5)
- December 2012 (9)
- November 2012 (3)
- October 2012 (3)
- August 2012 (4)
- July 2012 (2)
- June 2012 (1)
- May 2012 (6)
- March 2012 (13)
- February 2012 (12)
- January 2012 (9)
- December 2011 (9)
- November 2011 (4)
- October 2011 (5)
- September 2011 (10)
- August 2011 (10)
- July 2011 (2)
- June 2011 (8)
- May 2011 (12)
- April 2011 (4)
- March 2011 (14)
- February 2011 (8)
- January 2011 (32)
- December 2010 (23)
- November 2010 (19)
- October 2010 (10)
- September 2010 (6)
- August 2010 (1)
- July 2010 (1)
- June 2010 (6)
- March 2010 (7)
- February 2010 (3)
- December 2009 (3)
- November 2009 (11)
- September 2009 (2)
- July 2009 (1)
- June 2009 (5)
- May 2009 (1)
- April 2009 (2)
- March 2009 (3)
- February 2009 (6)
- January 2009 (3)
- December 2008 (8)
- November 2008 (5)
- October 2008 (3)
- September 2008 (3)
- August 2008 (3)
- June 2008 (6)
- May 2008 (2)
- April 2008 (3)
- March 2008 (5)
- January 2008 (3)
- December 2007 (3)
- November 2007 (13)
- October 2007 (10)



12 Responses for "Switch SATA Operation Mode"
I found two problems in the registry output when using this program with my Dell Latitude E6410 – both were on the same key. The output was:
; Add Serial ATA Controller to the Critical Device Database
[HKEY_LOCAL_MACHINE\SYSTEM\CurrentControlSet\Control\CriticalDeviceDatabase\PCI\VEN_8086&DEV_3B2F&CC_0106
The first problem was that the end of the key was missing a right bracket. Also, In Windows 7 I noticed that all of the PCI devices under CriticalDeviceDatabase are not listed under a subkey PCI\ but rather simply start with PCI#. So the final version of this line that made my computer boot properly looked like this:
; Add Serial ATA Controller to the Critical Device Database
[HKEY_LOCAL_MACHINE\SYSTEM\CurrentControlSet\Control\CriticalDeviceDatabase\PCI#VEN_8086&DEV_3B2F&CC_0106]
Thanks for your comment Aaron, I will look into it and see if there’s an error in my tool.
Overall, its an awesome tool. I don’t mean to discredit it by any means.
It got the job done for me after making those very minor edits and installing the Intel RST driver to get a copy of iaStor.sys in the System32\Drivers directory (as you noted must be done). I have since uninstalled the Intel driver to remove the services running in the background I don’t use.
Don’t worry Aaron, in fact I’m very happy with your feedback (thanks for taking the time for it).
Great blog, tool and addendum got it to work fine on my dell E6320. but my disk transfer rate (as measured by the win 7 experience index) actually went down from 7.7 to 7.4 after completing the switch so I’m not sure it was worth the effort. Anyone else seen an improvement
Thanks for crafting SCI, Remko. Could you please compile a 64-bit version? Attempting to run SCI.exe under a 64-bit WinPE disc returns:
“The subsystem needed to support the image type is not present.”
since WOW64 is not available:
http://stackoverflow.com/questions/4339744/running-32-bit-apps-in-winpe-3-win7-64-bit
Thanks Remko! This really saved me. For one of my clients I was trying to change a HD to a SSD in a Dell Precision M6600. I had to make the same changes to the generated REG-file as Aaron above. Below you’ll find the content of this REG-file. It’s W7 64 bit.
————————–
Windows Registry Editor Version 5.00
; Generated with SATA Controller Identifier
; by Remko Weijnen
; see https://www.remkoweijnen.nl/blog/2011/06/18/switch-sata-operation-mode/
; Set Microsoft AHCI driver to Autostart
[HKEY_LOCAL_MACHINE\SYSTEM\CurrentControlSet\services\msahci]
“Start”=dword:00000000
; Add Intel(R) Mobile Express Chipset SATA AHCI Controller to the Critical Device Database
[HKEY_LOCAL_MACHINE\SYSTEM\CurrentControlSet\Control\CriticalDeviceDatabase\PCI#VEN_8086&DEV_1C03&CC_0106]
“ClassGUID”=”{4d36e96a-e325-11ce-bfc1-08002be10318}”
“Service”=”iaStor”
; Set Intel iaStor driver to Autostart
[HKEY_LOCAL_MACHINE\SYSTEM\CurrentControlSet\Services\iaStor]
“Type”=dword:00000001
“Start”=dword:00000000
“Group”=”SCSI miniport”
“ErrorControl”=dword:00000001
“ImagePath”=”system32\\drivers\\iaStor.sys”
“tag”=dword:00000019
“DisplayName”=”Intel AHCI Controller”
[HKEY_LOCAL_MACHINE\SYSTEM\CurrentControlSet\Services\iaStor\Parameters]
“queuePriorityEnable”=dword:00000000
; Add Device Instance Path to the iaStor Enum key
[HKEY_LOCAL_MACHINE\SYSTEM\CurrentControlSet\services\iaStor\Enum]
“Count”=dword:00000001
“NextInstance”=dword:00000001
“0”=”PCI\VEN_8086&DEV_1C03&SUBSYS_04A41028&REV_04\3&11583659&0&FA”
Hey Remko, was curious if you had time to take a look at the tool? There seems to be multiple people that have replied where they had to make the same changes I did to the reg file. I would like to keep it in my toolbox once you get it updated.
Thanks, Aaron
Held! Ben dagen aan het zoeken geweest naar de juiste registry entry, met dit tooltje eindelijk succes! Dank hiervoor!
Still hoping you get around to updating the tool. Just had to use it again! TAhnks!
Thanks to this page, the program and the comments from other folks I was able to change my Windows 7 Prof. 64 bit installation, on a Dell E6410, from ATA to AHCI mode. I have an Intel SSD as the sole drive of this machine, and used Intel’s data migration software to get the system from the original hard drive to the SSD. This Win 7 installation was done before I bought the machine, and was evidently done with the BIOS set for ATA mode:
System Configuration > SATA Operation = ATA
I wanted to use AHCI mode partly for performance and the TRIM command, but also because this mode, and “RAID” mode (really this means IRRT Intel Rapid Restore Technology), is the only way that the eSATA ports work. (One is on the laptop and the other on the E-Port Plus II port expander, which I found works really well, despite not finding any doco at Dell about which port expander suits the E6410.)
When I changed the BIOS setting to AHCI, Windows would not boot. When I changed it back to ATA, it still would not boot, but if I let the autmatically launched repair process continue to the end, I could then reboot and have Windows load successfully.
I found a plethora of websites concerning this problem of trying to change the SATA hardware from ATA to AHCI mode without re-installing the entire operating system, and therefore all the applications etc. Dell recommends doing this, but they have a very complicated looking alternative here:
http://www.dell.com/support/article/us/en/19/SLN285045/EN
I decided against this, even though it mentioned the E6410.
My initial attempts involved installing the SATA drivers from the Dell site for this laptop:
http://www.dell.com/support/home/us/en/04/product-support/product/latitude-e6410/drivers
When I tried installing two drivers which looked relevant to SATA, from the Chipset department: “Intel Unified AMT6 HECI Driver” and “Intel AMT HECI Driver”, they both failed, with an error message that computer “does not meet the minimum requirements”. I figure this is due to the driver expecting the hardware to be already set up for AHCI operation. But if it was set up like this, I could not boot Windows.
Hundreds of thousands of people evidently have the same trouble and there are lots of pages with instructions on how to fix it, by one or more registry changes, and then either rebooting with ATA to allow the installation of a driver, or directly changing to AHCI mode. I spent half a day finding this stuff out – and finding none of these worked for me.
This page seemed to be a lot more clueful, so I spent a few hours following it. The first step is to get Windows PE going (I had never heard of it). This involves installing Windows ADK (likewise) and following the instructions here:
https://technet.microsoft.com/en-us/library/dn293200.aspx
After installation, I could get to the command prompt of ADK via:
Start > Windows Kits > Windows ADK > Deployment and Imaging Tools Environment
The instructions generate an ISO file for 64 bit Windows PE. As Miles wrote, Remko’s program (V1.1) is 32 bit and only runs under the 32 bit version of Windows PE. This is what I did to create a 32 bit Windows PE ISO file, which I then burnt to a CD-R:
copype x86 C:\WinPE_x86
MakeWinPEMedia /ISO C:\WinPE_x86 C:\WinPE_x86\WinPE_x86.iso
Before using this, I downloaded Remko’s SCI.zip file (from the link at the end of the article) to a directory and unzipped its contents to:
C:\xyz\SCI\
I then rebooted the machine, changed the BIOS setting to AHCI, and selecting boot from the DVD burner, which contained the 32 bit Windows PE disc. When it booted, I CDed to to the above directory and ran the SCI.exe program there. This enabled me to save a file with a set of commands for changing the registry. I edited this in two ways, as suggested by Aaron:
Added a ‘]’ to the end of line 12.
Changed “PCI\VEN” to “PCI#VEN” to match the pattern of names in the
Registry.
I saved this as abc.reg. I was going to copy the file
C:\xyz\SCI\Drivers\x64\iaStor.sys 2010-11-05
to C:\Windows\System32\drivers\iaStor.sys, but there was already a later version of this file there (2012-02-02). I am not sure how it got there, but with ZTreeWin I found that the same file existed in two directories, whose dates matched the time the OS was installed:
C:\Windows\System32\DriverStore\FileRepository\iaahci.inf_amd64_neutral_4b6764daf5ce9174
C:\Windows\System32\DriverStore\FileRepository\iastor.inf_amd64_neutral_4ffa60c18b7e0989
I then rebooted, set the BIOS to ATA mode, created a system restore point (in case the next step rendered Windows unbootable), ran regedit and used it to import abc.reg. Regedit reported that this was successful.
I then rebooted, set the BIOS to ACHI mode, and Windows booted successfully, with the eSATA ports working perfectly.
Thanks very much!
– Robin http://www.firstpr.com.au Daylesford Australia
I used this tool today for a Windows 7 to switch an AMILO from RAID to AHCI.
I had the same 2 problems like Aaron Wilk.
Take care the reg file is fixed before implemeting it, then it works fine.
Thanks for your effort.
PS. Update this website. Its incredible.
Leave a reply